Pages

Showing posts with label Quilts. Show all posts

Sunday, September 11, 2011

3-D Starburst Tutorial

I am SO excited about another 3-D technique that came to my attention last week. While these types of patterns do use a little more fabric, it is amazing how much depth and dimension they add to a quilt. This one comes from Linda over at her blog, Buzzing and Bumbling. She calls it a 3-D Starburst and I think it looks so attractive.
The tutorial can be found here . Linda plans to use it as a tablecloth with her turquoise Fiesta dishes. You can just imagine how pretty it will look, can't you?  It is such a clever way to use colored hankies too!

Speaking of fun 3-D patterns, here is a sneak peek at what I am working on now.
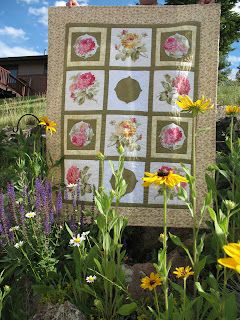
It's a pattern from Cotton Way called "Pinwheel Posies Again". I had never made fabric covered buttons before and was surprised how easy it is to do! The quilt itself will take me awhile since I keep getting distracted by all the cute little crochet hat patterns that keep showing up in my email inbox. :) And by the adorable purse pattern I saw and just HAD to make. I'll post about it as soon as I get the straps on.

Until next time... blessings to you~


Friday, August 19, 2011

Bonus Quilt

I was lamenting to my son last night about never having any original ideas. I almost always have to see some one else's idea before it becomes even a microscopic blip on my brain's creativity radar screen. Then I think, "Now why didn't I think of that!". It's as if my brain is finite, with set boundaries that cannot be expanded. It cannot be forced to go places that don't exist. I do not like fiction books and I didn't teach my kids fairy tales or nursery rhymes. Sad, huh? Kind of makes it awkward during those baby shower nursery rhyme games. Haha! This is why I present to you, with great pride, exhibit A.
 There was no pattern. After what you've just read this is shocking, I know. I had some left over floral fabric from the back of this quilt and wanted to showcase it somehow because I think it is so pretty. I got right brain stretch marks from trying to figure out ways to use what I had and turn it into something of a usable size. I had to piece one of the large flowers to get the number of blocks I needed. In some circles this is seen as tacky. In the senior center quilt group where I volunteer, it is a badge of honor. To depression era folks (the first one, not the one we are in now), it means you were frugal and used what you had in your hand. It is something to be praised and admired.
 I won't tell them I had to go out and buy the border fabric to pull my "bonus quilt " all together. Shhh!

Blessings to you~   


Saturday, August 13, 2011

I May or May Not Be Indecisive


  Ask my family to describe me in one word and they will likely say "indecisive". I don't like being that way but it just sort of ... happens. Take me to a new restaurant with an unfamiliar menu and I'm a mess. I have learned to hide it most of the time to avoid appearing like a crazy goon but, when quilting, it oftentimes overtakes me.

  There are SO many decisions to make before even sewing a stitch! Will the recipient value it? What is their decor style and colors? What pattern should I use? Which fabrics? Paper piece? Or not? What size? And then later... Which batting? Professional quilter or... me? Freehand custom or computerized all-over design? And what color thread? Bias binding? Label? Whew! I'm exhausted just typing this!

  I think I am the reason they started selling quilt kits. Most of the decisions have already been made for you! Trouble is, I always look at the price and say, "One hundred, sixty-nine dollars! I could make it for less than that!". So I am back to where I started from.

  I just finished "That Dorky Homemade Look" by Lisa Boyer. Love her sense of humor and can't wait to read her other book, "Stash Envy". My favorite chapter addresses just this problem. She says the solution is to 1.Make the best decision you can  2.execute it, and 3. learn to love your results. It is really freeing to let go of the stress and not over think it. That way I am not so overwhelmed before I even start that I don't do anything. (Which has happened to me on many occasions)
 
  Join me as I strive to love my decisions, even if they include some mistakes. Now, what to make for dinner? Sooo many choices!
Blessings to you~


Thursday, July 7, 2011

My "Learning Curve"

Whenever I spend time in quilting circles I usually always hear at least one person express their fear of curved piecing. I admit, I was fearful too. Until I found a pattern that was done up into such a beautiful quilt I HAD to give it a try. This is the result...

The pattern is called "Learning Curve" and was found in the August 2006 issue of American Patchwork & Quilting. It is written for a 48 1/2" square quilt but I wanted a baby quilt so changed a couple things. I had a lot of fun with it and have to say that the curves really weren't THAT bad. Especially for a small quilt like this.

 As usual, my long arm quilter made up for anything lacking due to my inexperience. I love her for that!
Yes, I know. It's very... well... PINK. But after having three boys, I think I've earned the right to make it as pink as possible for my niece's baby girl. Hope she loves it! Don't the blocks below look a little bit like old fashioned baby carriages. Okay, maybe I went too far that time!
                                          The curly hearts look so nice quilted in there.
 Blessings to you~


Saturday, June 18, 2011

Patriotic Pinwheels


 I finished this table runner for a friend just in time for the Fourth of July and also the deployment of her son, who is a Marine. It started out with a red, cream and blue Americana theme but when I saw the Marine fabric, I had a feeling she would prefer it. And she did! She really wanted it to run the full length of her table so it is 58" long.

 You can really get a lot of lift in those buggers by pressing them with the point of the iron in the fold to take out the crease.

I enjoy this 3-D block pattern so much and and have lots of fun with it. You might remember the last runner I used it in. The post, including the tutorial, can be found here.


My all time favorite 3D Pinwheel quilt was made by Geta at Geta's Quilting Studio. I love how she used the smaller, dark pink pinwheels in between the framed blocks. She also used the smaller size in the border which really finishes it off nicely.


While you are visiting Geta's blog, be sure to check out her spectacular trapunto. It is breathtaking!
Blessings to you~

Tuesday, May 31, 2011

Pink John Deere

 When you think "John Deere" fabric your mind probably doesn't automatically jump to "Cathedral Window" does it? Didn't think so. I couldn't help myself though when this fabric showed up in a bag of donations. I needed a way to showcase the little deer logo and I think it works. I also think a little baby won't know the difference. Haha!            
                  This is really a faux cathedral window but it's as close as I've ever come or ever will come to making a real one. It's so fun and easy I see no reason to slave away for hours for the same result! Those of you who are purists out there probably beg to differ. lol
             For each block you will need 4-3 1/2" background squares and 1-6 1/2" square.

 Fold the 6 1/2" square in half, wrong sides together. Lay this folded piece with the raw sides away from you and the folded edge toward you.Take 2-3-1/2" squares and with the right sides together, sandwich the larger, folded square between the two at the left edge.Match the edges that are away from you.
                          Pin and do the same thing on the right hand side. Sew those two seams.
It will look something like an "H" or bridge shape.

 By matching the edges that are away from you, it leaves a 1/4" seam allowance at the edge closest to you.

 Pull apart the "bridge" that was formed and match the two long edges together. Nest the seams in the middle to distribute the bulk. Pin and sew. Now the fun step! Fold it open flat and press.

 You can either leave it like this, stitch it down now or later when you quilt it, or do it MY favorite way. Roll back the four sides to make a nice curve and stitch it down. Since the sides are on the bias, it folds beautifully! Some folks insert a third fabric in the center before rolling it in and sewing but, so far I am loving it this way.


                       This charity quilt will be taken to the Senior Center for the ladies to tie.
   Hope it goes to a tomboy baby! Not sure if you can tell yet when they're still using a crib quilt. lol You moms with girls will have to let me know!  


Blessings to you~

Sunday, May 22, 2011

Quilt Show Inspiration

This weekend was our guild's show. What an amazing transformation to watch as we all worked together to show our community some of the incredible talent tucked away here. I tried to take a picture every hour so you could see the progress. This was taken around 8AM the day before the       show as the racks were being positioned.

                                               Next, all of the racks were assembled.
                                          

                                         Then, the hanging of the quilts on the lower level.
                                         

                                   Upper level complete and vendors are allowed to set up.


This is such a lovely venue it's a pleasure to spend three days there. Looking out across the colorful quilts from the upper level is breathtaking! In part, due to these...         
                             
                  
                                    And then there were special treats like this little gem.


And lots of these. I thought the award committee did a fantastic job making them. But then, you know how I love flowers. :o) That's a little mirror in the middle. 

What a fun weekend but... WHEW! Blessings to you~


Friday, May 13, 2011

Three-D Pinwheel Table Runner

   I have been having FUN with this little project. And lots of it! There were two little fat quarters tucked in a gift from my sister. She did a cherry gift theme (she always has a theme that she carries through). The fabric had cherries on it, naturally, and when I was asked for a donation for a fund raising auction, I jumped at the chance to try out this 3-D block pattern I had been eying. It looks so cheerful and fun!
 The tutorial I used had a mistake in it so I will tell how I did it instead. First, I cut my squares. You need four-4 1/2" squares out of your background fabric and four 3 3/4" squares out your pinwheel fabric for each block.


              Then, take a pinwheel square and fold it in half diagonally, wrong sides together.

              Take one of the points from the long side and bring it across to the other corner.
  
Pin to a background square. Make sure to pin each one the same way and to the same side of the square.

Baste them in place. Just trust me on this okay? It's the only way to make them behave and stay where they are supposed to.


After pinning really well, sew two squares together. Then the other two, pressing seams OPEN. The center of the pinwheel becomes too bulky if you don't press them OPEN. Really.


                      Now stitch both halves of the block together and this is what you have!


You can really get some good lift in the pinwheel blades if you get your iron in there and take out the creases that formed when you were assembling the block.


                 This is what the back side looked like after quilting. Looks so summery, doesn't it?


Blessing to you!