Pages

Showing posts with label Crafts. Show all posts

Monday, August 1, 2011

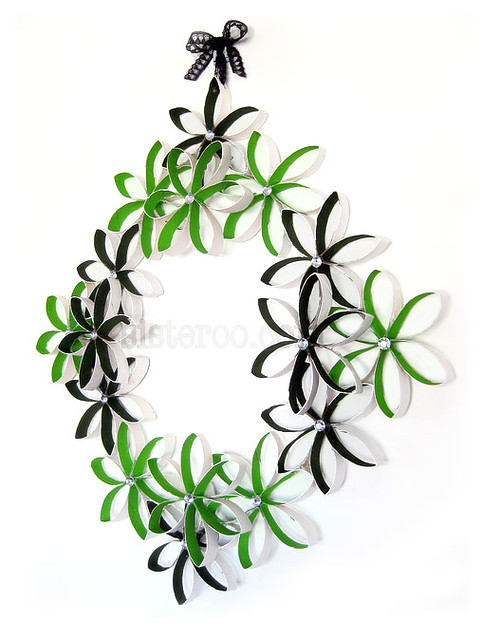
Toilet Paper Roll (yup, that's what I said) Wreath

 The "Lawyer" at Sisteroo did it again. This time she has come up with a beautiful craft made out of something we all have a steady supply of. Toilet paper rolls! You would never know of its humble beginnings, would you?
       lawyer_wreath   
She glammed it up with paint and jewels so it really looks pretty and delicate. You can find the tutorial here if you'd like to make your own. Or you could just read it for the the laughs because she makes even a toilet paper roll craft sound like fun!
Tomorrow, a recipe to use up some of these-
Blessings to you~

Monday, July 18, 2011

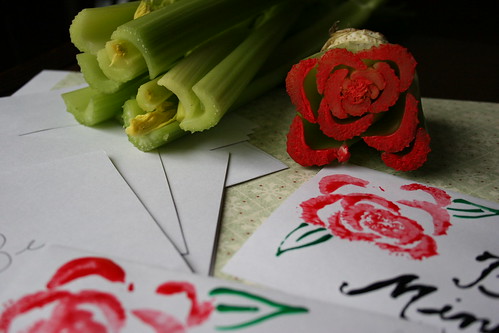
Celery Heart Stamp

 This idea from Maureen at Maureen Cracknell Handmade really caught my eye. I love the idea of using what you have on hand and this certainly fits the bill! If you remember the potato stamp craze you will not find this strange at all. :D I LOVE the rose shape it duplicates on paper and it has me wondering about all sorts of veggies and what I could stamp with them. You can find Maureen's directions here. While you are visiting, check out her more recent posts showing things she has made using felt flowers. So bright and cheerful!
Making cards


If only I could figure out to do with that jar of Hearts of Palm in my pantry!                                  Blessing to you~                           

Wednesday, May 4, 2011

Hanging Flower Balls

 I just found the prettiest hanging decoration for those of us who love, Love, LOVE roses.
 Shelley at House of Smith's has a great tutorial showing how to make them. Shelley says that even if some of them don't look that great, it will look beautiful once it's all done. I love projects like that because I seldom have consistent outcomes when I'm repeating the same thing over and over. They are so very sweet and would look darling in a nursery or little girls bedroom. I'm thinking I'd like them in my sewing/guest room. Look how else she used them.


On another blog they had simply perched them on top of dollar store glass candle stick holders and they were gorgeous too. Can't wait to try them!
Blessings to you~

Monday, May 2, 2011

Dahlia Felt Brooch

  Happy May everyone! It will be Mother's Day before you know it so I want you to see this lovely gift idea from Megan at Not Martha. Aren't they yummy?

[dahlia corsages in reds, pinks and yellow]

They have a secret compartment on the back where you can tuck a photo or love note!

[pin backs showing pockets stitched in matched thread colors]

Don't you LOVE it? The tutorial link can be found here. And be sure to read the updates Megan has added about the best felt and glue to use. She has plenty of other great ideas to keep you busy too.

Seeing this gorgeous dahlia makes me miss my Mommy. :o( Maybe I'll make one for me in her honor!
Blessings to you~

Friday, April 22, 2011

Wire Bird's Nests


I adore these little buggers! So much so that I ordered a robin's egg blue one on Etsy. It makes me smile every time I look at it. It symbolizes hope and life and spring and the anticipation of good things to come. That is why I was SO excited to find Rissa's tutorial on her blog, Hazel and Honeysuckle. She was kind enough to share it with us and I hope you will check it out and see how easy these are to make.
Our winter is extending well into spring in the Rocky Mountains and I am clinging to the hope that sunnier days are coming!


Blessings to you and happy Easter~ Celebrate a risen Savior!

Tuesday, April 19, 2011

Popsicle Stick Bracelets


I bet when you saw the title of this post you had visions of something really tacky and ugly. Well, I hope you were pleasantly surprised! I think these are so elegant and pretty and the designs on them kind of remind me of quilt blocks. This idea comes from Susan over at Suzy's Artsy Craftsy Sitcom and the tutorial can be found here. Granted, much of their beauty is due to the fact that the gal is obviously a talented artist, but I think the possibilities are endless and I plan on trying this as soon as I can get the supplies. Join me!
Blessings to you~

Thursday, April 14, 2011

Rose Pin Made from Tights

Here is my version of the Upcycled Tights into Flowers from last Saturday. I really like how it looks. Both legs of the tights were used to make this 41/2" flower. The tights were little girls size 7.


I must have wrapped mine differently than Tatum because they look totally different, but I like both styles. I had to buy a pair of tights which isn't all bad because this is going into a charity auction so they were nice and bright pink. On the down side, it's not really "upcycled" now is it? This is what the back looks like.


Blessings to you~

Saturday, April 9, 2011

Upcycled Tights into Flowers

I think my recent obsession with flowers might indicate that I am VERY ready for spring to get here. But alas,  we received another five inches of snow yesterday so the only flowers in my future are ones I create. Thanks to Tatum at k.i.s.s. {Keep it Simple, Sister} and this tutorial, it is possible make super cute flowers out of, get this, old tights or panty hose. Isn't that awesome? Since I was blessed with three boys, I plan on having my friends with girls save their old ones for me. Can't wait to see their faces when I put in this request! Aren't they beautiful?


Hope you get a chance to visit Tatum's new blog and try out this project!
Blessings to you~


Image and project from {K.I.S.S.} Keep It Simple, Sister

Thursday, April 7, 2011

Felt Chicks

My day started with a smile when I read this post over at Myrtle & Eunice. Not only are these little guys adorable but the post is so funny that it's worth a visit just to read it! You really should use the links that inspired the chicky poses too. Hilarious!!!


Blessings to you,

Tuesday, April 5, 2011

Rosette Obsession


I LOVE flowers! All kinds. I can't think of any that I don't like and some are SO amazing to me that I just marvel at creation whenever I look at their details. I liked them when it wasn't cool to like them and so, the recent trend to use flowers on anything and everything as fashion accessories  is a big smile maker for me. This week I've been making the pretty, little rosettes that have been showing up all over. They are easy enough to make yourself so give it a try! I noticed there are several tutorials available already that are very good. They vary only slightly from the way I make mine.


For my necklace I cut a 1" width of fabric (WOF) strip so that, when finished, it wouldn't stand out away from my body too far. The two smaller roses on the necklace were made from 1" strips that were cut from a fat quarter so only 21" wide. For the orange pin shown below I made the strip 1 1/2" wide These can be made from scraps, sheets or an old shirt too so very economical!

 I then fold the strip in half length wise, right sides together. I press mine to make it behave but you don't have to.


                                Tie a knot in the end and fold the tail back on itself. Glue in place.


Circle around a couple times until you have a nice bud, gluing as you go. Then, twist the fabric strip, dot with glue and continue around, twisting every so often as you see fit. I like to stagger the twists so they aren't all in the same place. Add a dot of glue after each twist and any place where it needs stability.


                            When it reaches the desired size, glue the tail to the bottom of the rose.


Attach to a piece of felt and add a pin backing if you plan to wear it as a pin or if making a necklace, layer the chain in between the felt and roses.


                                                               SO feminine and pretty!


Tomorrow.... more beautiful roses but something completely different! Blessings to you~ Luci