Pages

Monday, August 1, 2011

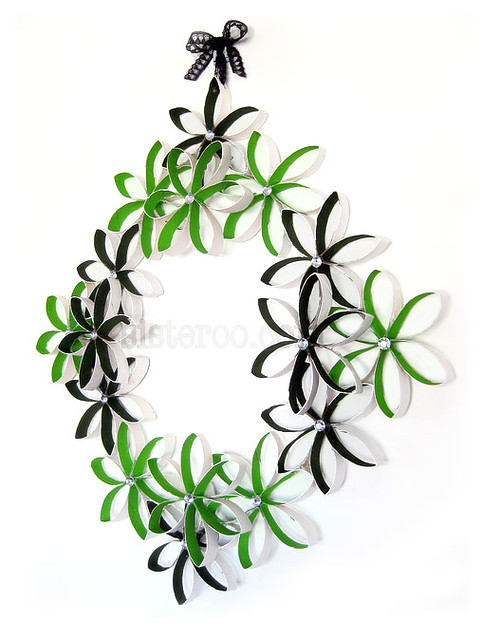
Toilet Paper Roll (yup, that's what I said) Wreath

 The "Lawyer" at Sisteroo did it again. This time she has come up with a beautiful craft made out of something we all have a steady supply of. Toilet paper rolls! You would never know of its humble beginnings, would you?
       lawyer_wreath   
She glammed it up with paint and jewels so it really looks pretty and delicate. You can find the tutorial here if you'd like to make your own. Or you could just read it for the the laughs because she makes even a toilet paper roll craft sound like fun!
Tomorrow, a recipe to use up some of these-
Blessings to you~

Tuesday, July 26, 2011

Chocolate Butterflies and WIP

While checking out blogs I came across Sisteroo and got some great ideas. It's a fun blog by four sisters who have very different backgrounds. I especially fell in love with these lacy chocolate butterflies and dragonflies. Aren't they pretty and delicate looking? "Lawyer" shows us how to make them here with a great tutorial that makes me feel like I could even do it!
CUPCAKES
This post about turning a plain pair of pumps into a layered heel style that mimics a VERY expensive Kate Spade style is drool worthy also. In a different way, of course.

I rarely post about a work in progress but it was a giveaway requirement so here I go...
It is a charity quilt made from all kinds of dog prints using the 10 minute block technique. I plan to put a solid sashing between the blocks since there are a variety of prints being used. I did manage to make each block from the same print though. It's going together quickly which is fine with me. I like to see fast progress!
Blessings to you,


Thursday, July 21, 2011

Cherry Sweet Rolls with Rhubarb Jam

 For one 24-hour period it got cool enough to actually turn on my oven! I knew it had to be for something really good and I had been saving this recipe for such a time as this. They were worth the wait and you can find the recipe here at Barbara Bakes. This dough feels SO good in your hands! I think it's all the eggs and butter. Yum! Sadly, I had no anise but they were delish anyway.
Also, where it calls for black cherry jam, I substituted my homemade rhubarb/strawberry jam.
                                                        Rhubarb Strawberry Jam 
                                        4 c. chopped rhubarb
                                        4 c. sugar
                                        1 box frozen, sweetened strawberries
                                        1 (3oz.) box strawberry gelatin
Mix rhubarb, berries and sugar. Cook and stir for 15 minutes from the time it boils. Remove from heat and stir in gelatin until it is dissolved. Pour into jars or freezer containers. It thickens as it cools. I leave one in the fridge at a time and freeze the rest.
Variation: Use 5 c. rhubarb, 4c. sugar, 1 (20 oz.) can crushed pineapple and 2 (3oz.) pkg. strawberry gelatin.

Sweet blessings to you~

Monday, July 18, 2011

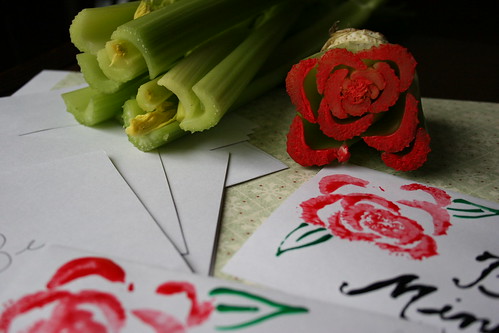
Celery Heart Stamp

 This idea from Maureen at Maureen Cracknell Handmade really caught my eye. I love the idea of using what you have on hand and this certainly fits the bill! If you remember the potato stamp craze you will not find this strange at all. :D I LOVE the rose shape it duplicates on paper and it has me wondering about all sorts of veggies and what I could stamp with them. You can find Maureen's directions here. While you are visiting, check out her more recent posts showing things she has made using felt flowers. So bright and cheerful!
Making cards


If only I could figure out to do with that jar of Hearts of Palm in my pantry!                                  Blessing to you~                           

Thursday, July 7, 2011

My "Learning Curve"

Whenever I spend time in quilting circles I usually always hear at least one person express their fear of curved piecing. I admit, I was fearful too. Until I found a pattern that was done up into such a beautiful quilt I HAD to give it a try. This is the result...

The pattern is called "Learning Curve" and was found in the August 2006 issue of American Patchwork & Quilting. It is written for a 48 1/2" square quilt but I wanted a baby quilt so changed a couple things. I had a lot of fun with it and have to say that the curves really weren't THAT bad. Especially for a small quilt like this.

 As usual, my long arm quilter made up for anything lacking due to my inexperience. I love her for that!
Yes, I know. It's very... well... PINK. But after having three boys, I think I've earned the right to make it as pink as possible for my niece's baby girl. Hope she loves it! Don't the blocks below look a little bit like old fashioned baby carriages. Okay, maybe I went too far that time!
                                          The curly hearts look so nice quilted in there.
 Blessings to you~


Wednesday, July 6, 2011

Friday, June 24, 2011

Easy One Seam Potholders

 I had some left over fabric after making the Patriotic Pinwheel Table Runner and decided to make some matching potholders out of it for the same friend. While at Sit and Sew one week someone showed me this easy way to make them so I was eager to try it out.
  All of the squares are cut the same size. I had enough to make 8" squares but make them whatever size you like. First, layer one square, wrong side up. Next, put a square of heat resistant batting.(I used two for extra protection) Then, layer another square, right side up.(This will end up being the bottom of you pot holder.)
 Take the four squares you want showing on the "woven" side of your potholder and press them diagonally, forming triangles. Match one of the short sides of each triangle to the edge of the pile of squares. Work your way all around in this manner.
                                                        This is how it should look.
           Alternatively, you can fold them from side to side forming a rectangle and then layer them.
 When positioning the fourth side you will need to lift the first one to layer it properly. (Like you would if closing a box.)
        Sew around all four sides, without lifting the presser foot, using a 1/4" seam. Clip corners.
                                                           Turn right side out.   
                                                           That's it! Sew easy.
      
Blessings to you~