Pages

Tuesday, May 31, 2011

Pink John Deere

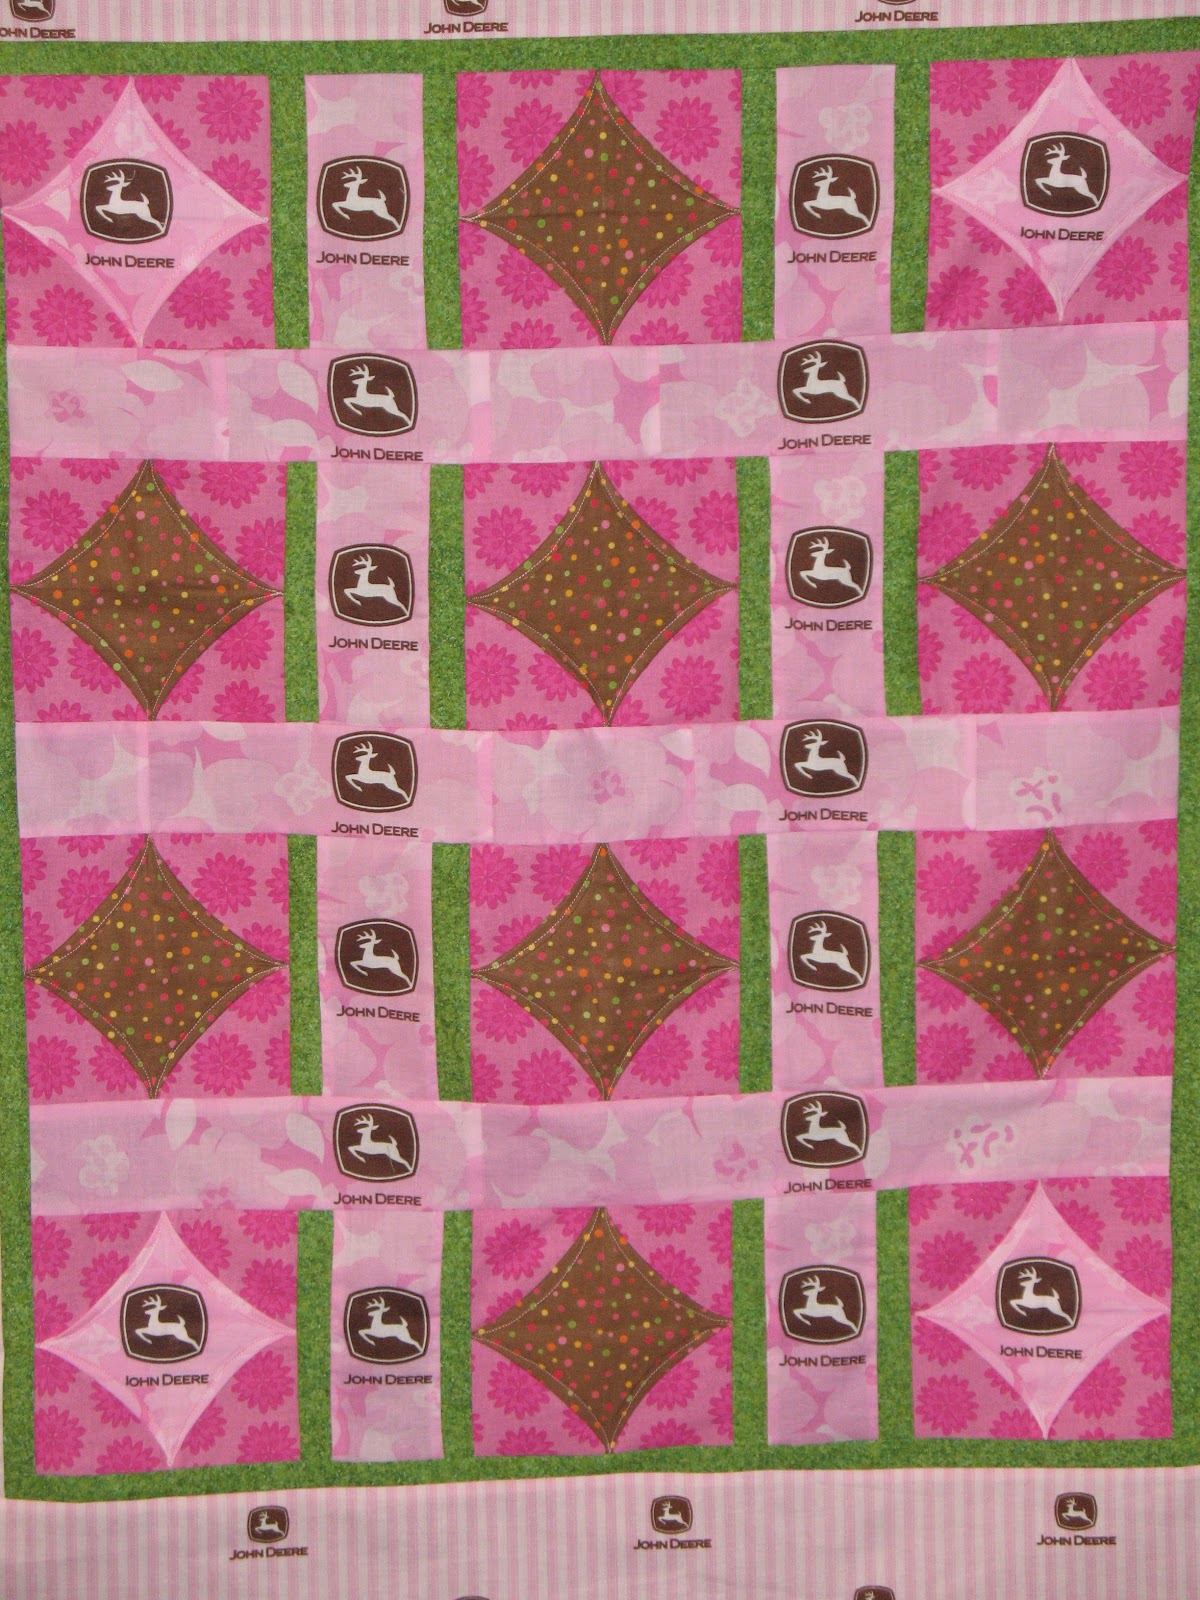
 When you think "John Deere" fabric your mind probably doesn't automatically jump to "Cathedral Window" does it? Didn't think so. I couldn't help myself though when this fabric showed up in a bag of donations. I needed a way to showcase the little deer logo and I think it works. I also think a little baby won't know the difference. Haha!            
                  This is really a faux cathedral window but it's as close as I've ever come or ever will come to making a real one. It's so fun and easy I see no reason to slave away for hours for the same result! Those of you who are purists out there probably beg to differ. lol
             For each block you will need 4-3 1/2" background squares and 1-6 1/2" square.

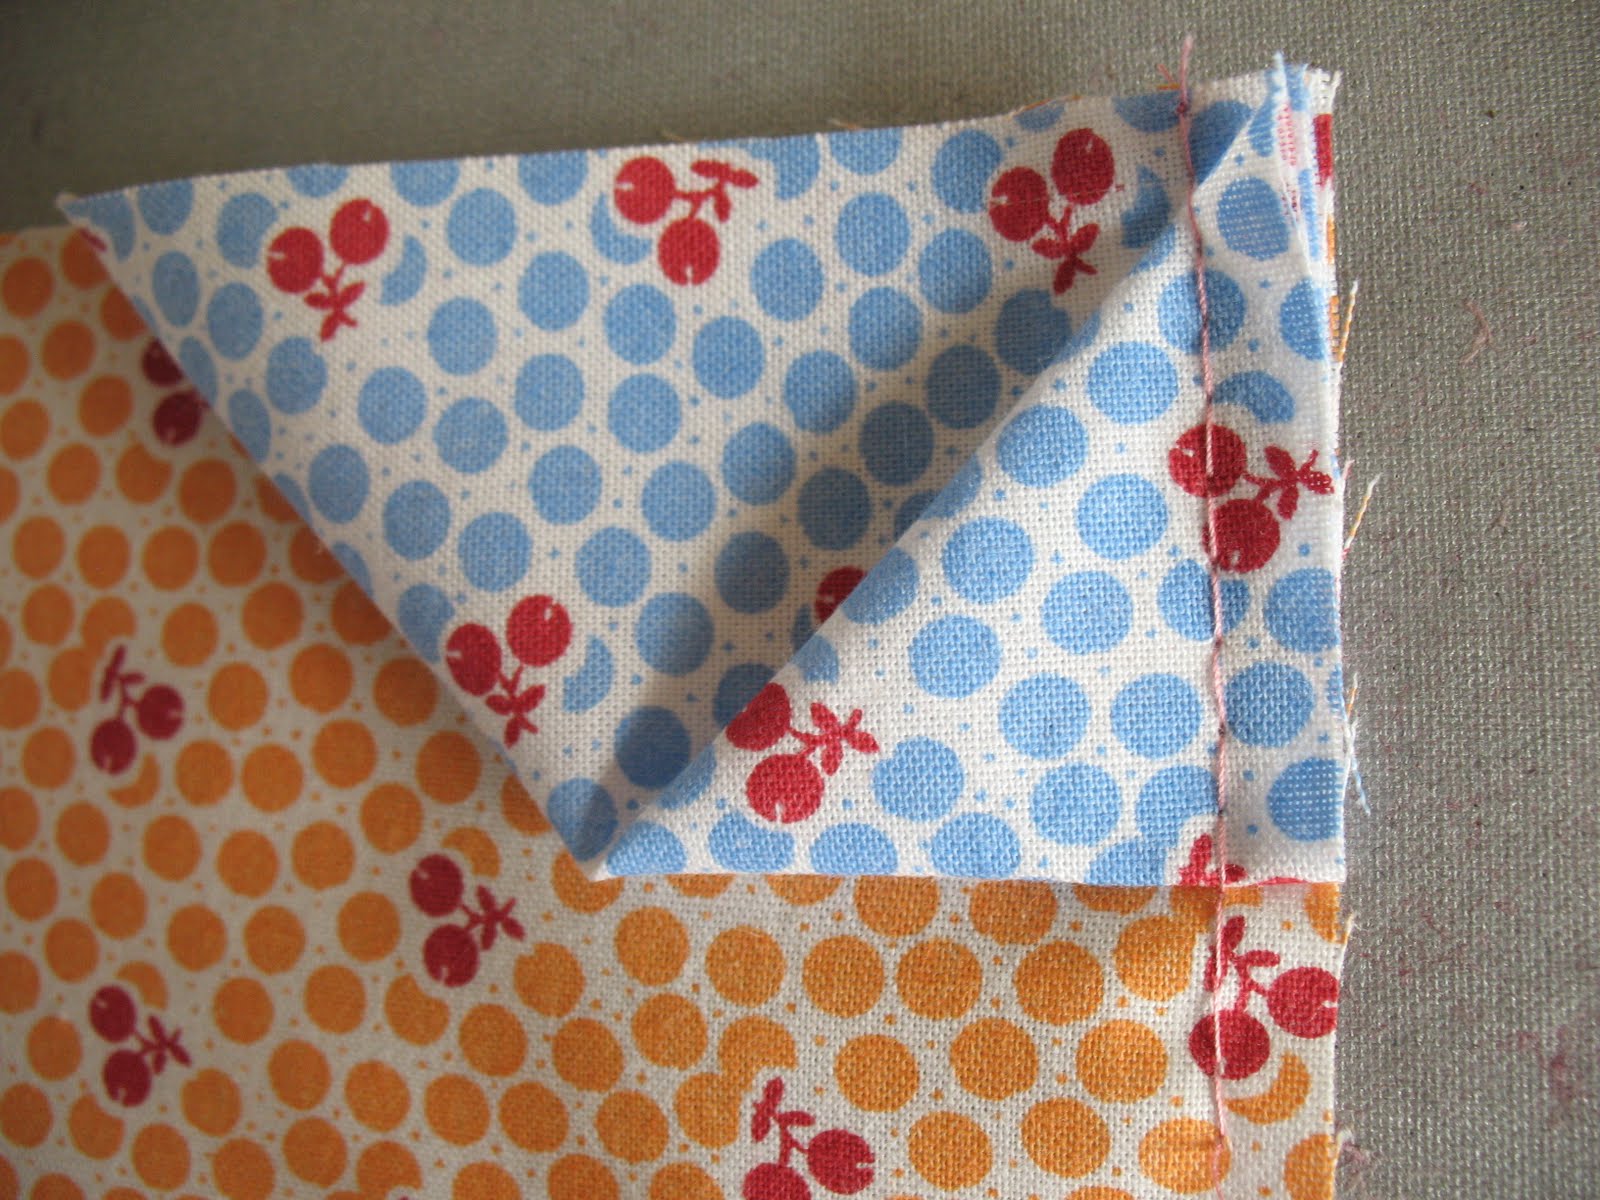
 Fold the 6 1/2" square in half, wrong sides together. Lay this folded piece with the raw sides away from you and the folded edge toward you.Take 2-3-1/2" squares and with the right sides together, sandwich the larger, folded square between the two at the left edge.Match the edges that are away from you.
                          Pin and do the same thing on the right hand side. Sew those two seams.
It will look something like an "H" or bridge shape.

 By matching the edges that are away from you, it leaves a 1/4" seam allowance at the edge closest to you.

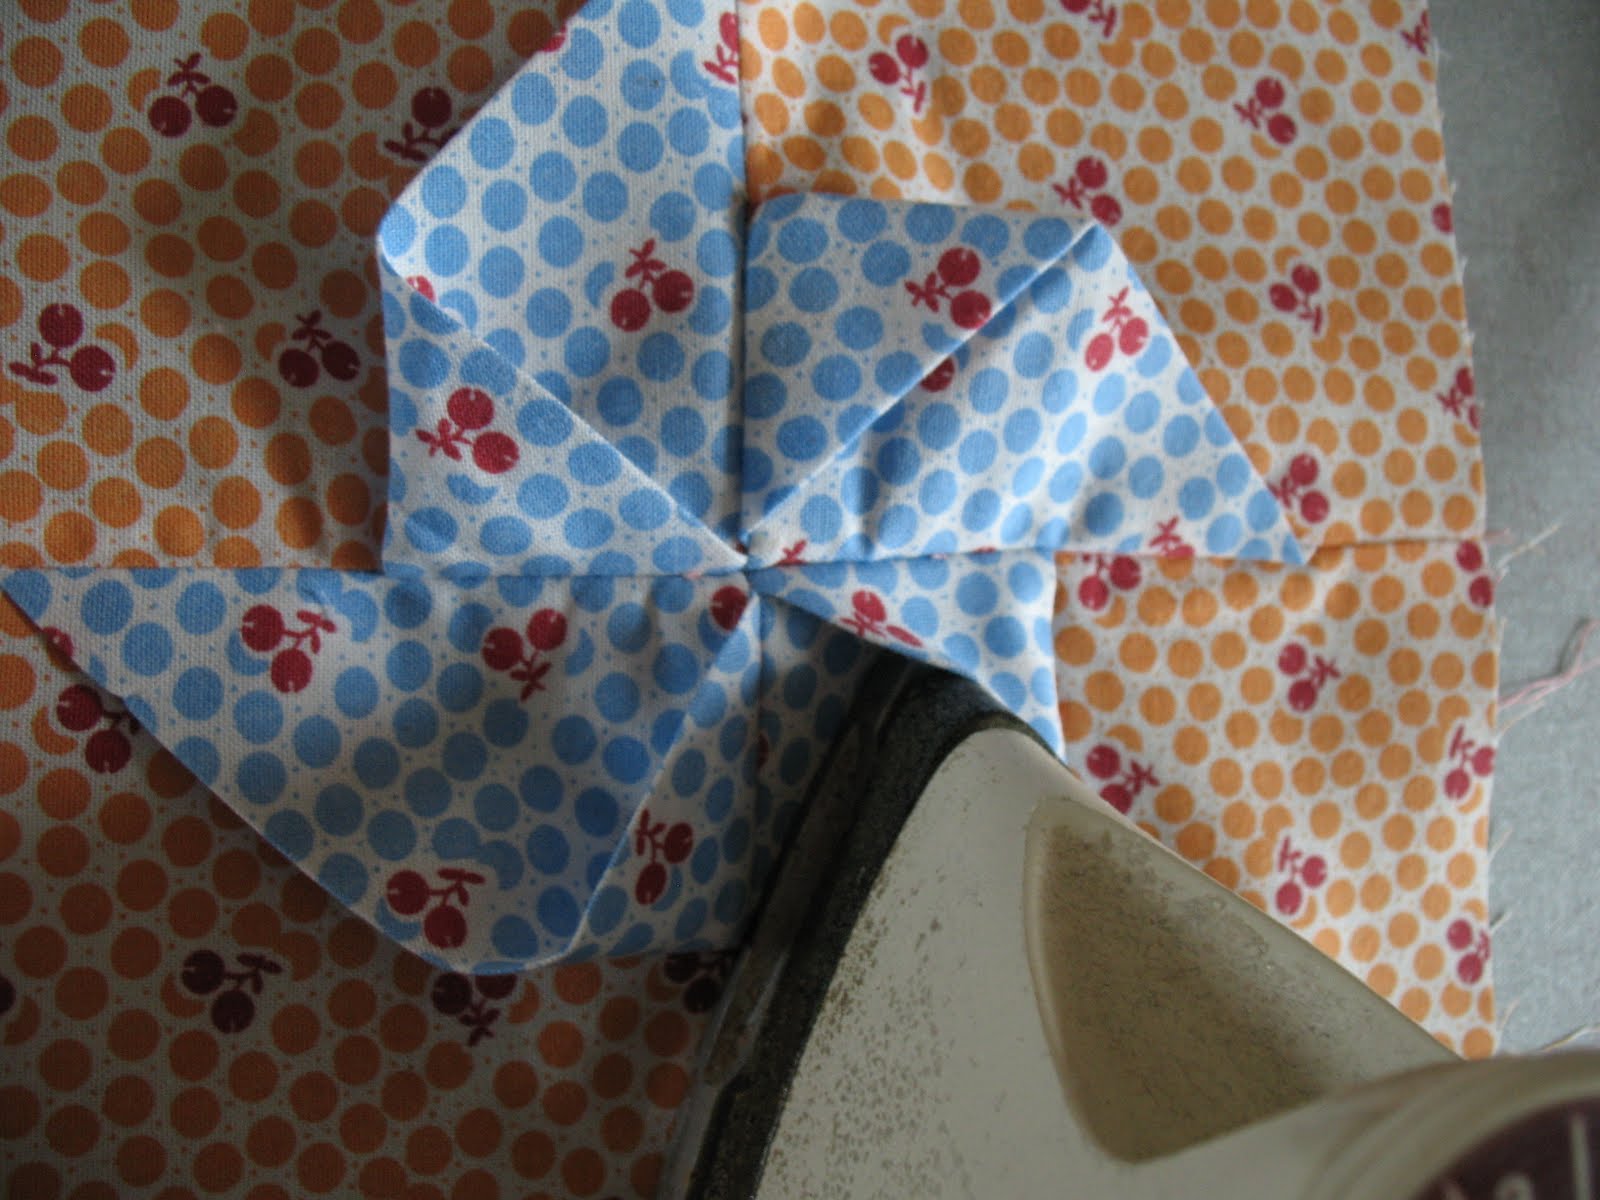
 Pull apart the "bridge" that was formed and match the two long edges together. Nest the seams in the middle to distribute the bulk. Pin and sew. Now the fun step! Fold it open flat and press.

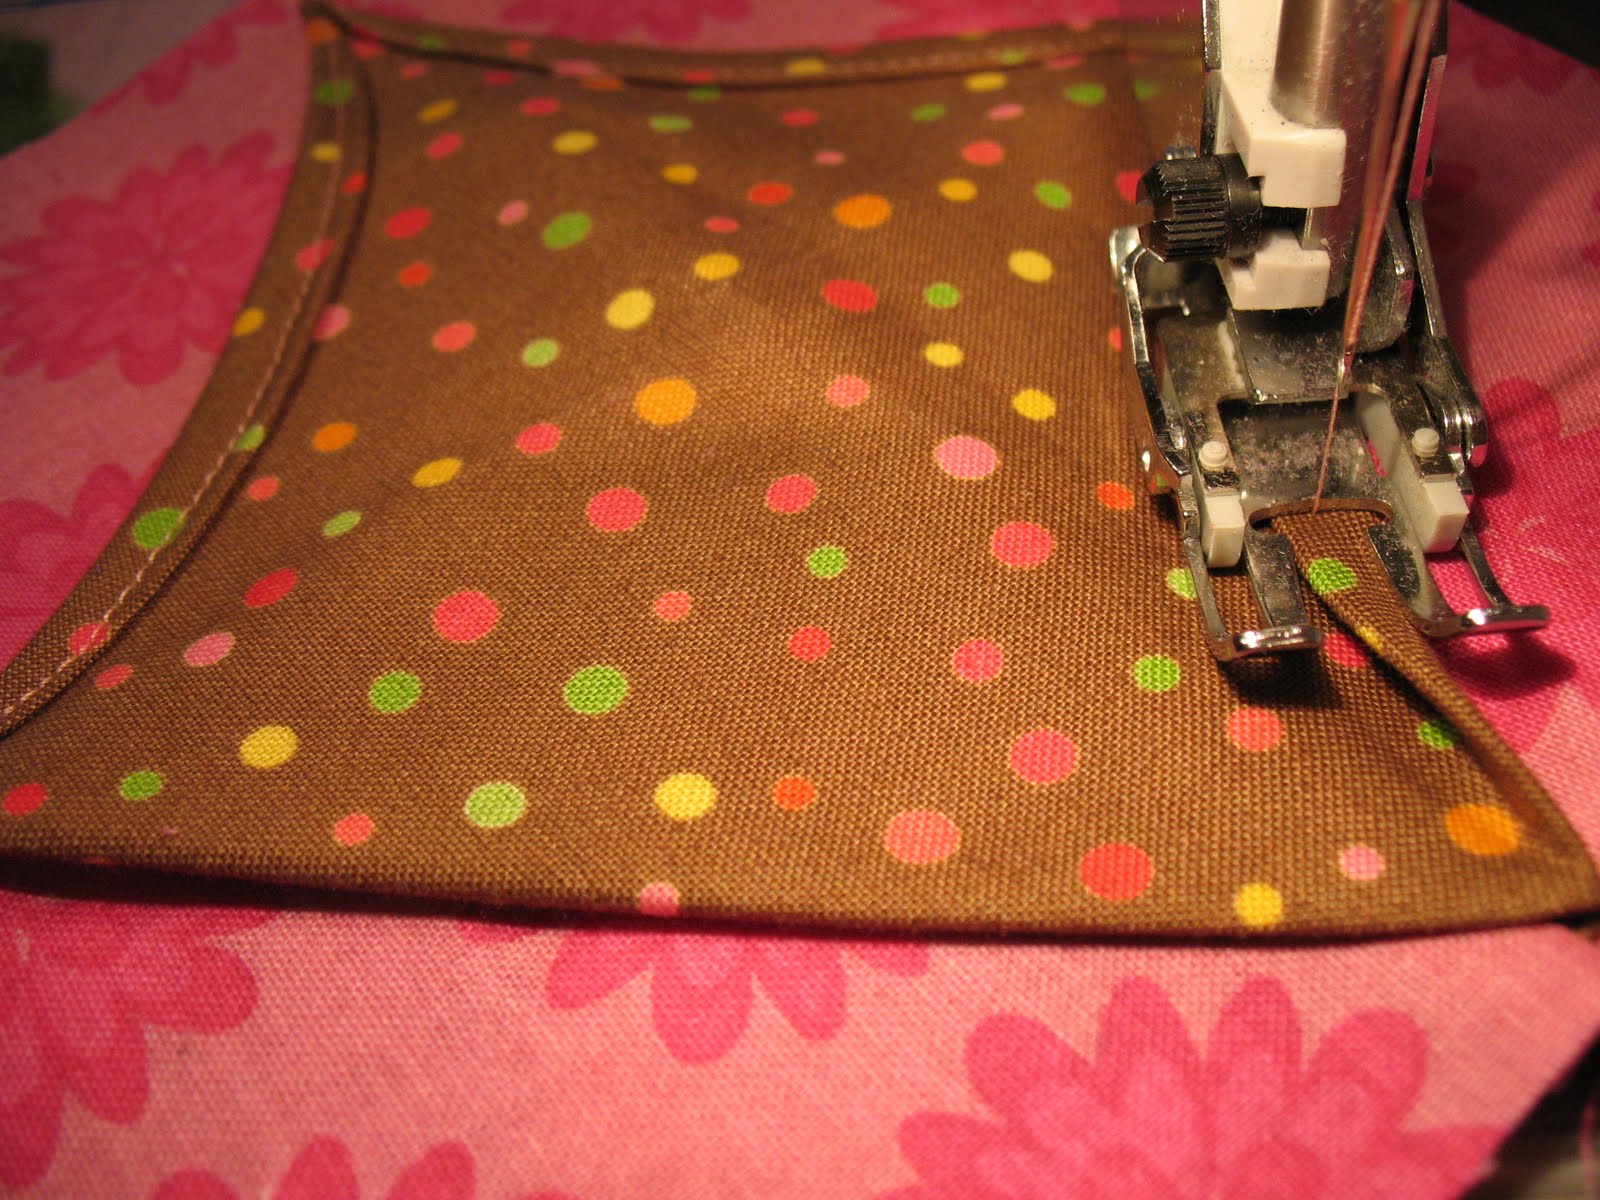
 You can either leave it like this, stitch it down now or later when you quilt it, or do it MY favorite way. Roll back the four sides to make a nice curve and stitch it down. Since the sides are on the bias, it folds beautifully! Some folks insert a third fabric in the center before rolling it in and sewing but, so far I am loving it this way.


                       This charity quilt will be taken to the Senior Center for the ladies to tie.
   Hope it goes to a tomboy baby! Not sure if you can tell yet when they're still using a crib quilt. lol You moms with girls will have to let me know!  


Blessings to you~

Sunday, May 22, 2011

Quilt Show Inspiration

This weekend was our guild's show. What an amazing transformation to watch as we all worked together to show our community some of the incredible talent tucked away here. I tried to take a picture every hour so you could see the progress. This was taken around 8AM the day before the       show as the racks were being positioned.

                                               Next, all of the racks were assembled.
                                          

                                         Then, the hanging of the quilts on the lower level.
                                         

                                   Upper level complete and vendors are allowed to set up.


This is such a lovely venue it's a pleasure to spend three days there. Looking out across the colorful quilts from the upper level is breathtaking! In part, due to these...         
                             
                  
                                    And then there were special treats like this little gem.


And lots of these. I thought the award committee did a fantastic job making them. But then, you know how I love flowers. :o) That's a little mirror in the middle. 

What a fun weekend but... WHEW! Blessings to you~


Monday, May 16, 2011

Sweet Pea Pendant

  Since I've started making the Fabric Rosette Necklaces and the Wire Bird's Nest Necklaces people keep saying to me, "I didn't know you make jewelery!". To which I say, "I don't ...err I mean I didn't ...but now I do ...but it's not REAL jewelry."  It just doesn't seem like the jewelery I make should qualify because, until a month ago, I didn't even know what a bail or a jump ring was! I don't know a thing about beading either. But I somehow manage to stumble upon tutorials that are so well done they make it look easy. That is the case with Amy at Positively Splendid. She has a fantastic tutorial that shows how to make these little beauties.


I always love things that can be personalized according to the number of children you have or the number of people in your family. I got enough inspiration on Amy's blog to keep me busy for months! In the mean time I'll be looking for just the right beads and craft wire to make my first Sweet Pea Pendant.
Blessing to you~

Friday, May 13, 2011

Three-D Pinwheel Table Runner

   I have been having FUN with this little project. And lots of it! There were two little fat quarters tucked in a gift from my sister. She did a cherry gift theme (she always has a theme that she carries through). The fabric had cherries on it, naturally, and when I was asked for a donation for a fund raising auction, I jumped at the chance to try out this 3-D block pattern I had been eying. It looks so cheerful and fun!
 The tutorial I used had a mistake in it so I will tell how I did it instead. First, I cut my squares. You need four-4 1/2" squares out of your background fabric and four 3 3/4" squares out your pinwheel fabric for each block.


              Then, take a pinwheel square and fold it in half diagonally, wrong sides together.

              Take one of the points from the long side and bring it across to the other corner.
  
Pin to a background square. Make sure to pin each one the same way and to the same side of the square.

Baste them in place. Just trust me on this okay? It's the only way to make them behave and stay where they are supposed to.


After pinning really well, sew two squares together. Then the other two, pressing seams OPEN. The center of the pinwheel becomes too bulky if you don't press them OPEN. Really.


                      Now stitch both halves of the block together and this is what you have!


You can really get some good lift in the pinwheel blades if you get your iron in there and take out the creases that formed when you were assembling the block.


                 This is what the back side looked like after quilting. Looks so summery, doesn't it?


Blessing to you!

Sunday, May 8, 2011

Violets

   My mother's name was Violet. She died too young and even though she's been gone almost thirty years, I think of her every day. She was such a giving person and a wonderful example to me of what a wife and mother should be. I was so blessed to be her daughter. She was the kind of mom who got her kids gifts for Mother's Day. She would say "If it weren't for you, I wouldn't be a mom!". Can you imagine? (By the way, I love my children but I do not give them gifts for Mother's Day.) In honor of her, I made this Bow Tucks purse as soon as I could get my hands on some violet fabric. It was a birthday gift for my sister.

I miss you mom and can only dream of being the mother you were.
Cherish every day you have with your mom! Blessings to you~

Wednesday, May 4, 2011

Hanging Flower Balls

 I just found the prettiest hanging decoration for those of us who love, Love, LOVE roses.
 Shelley at House of Smith's has a great tutorial showing how to make them. Shelley says that even if some of them don't look that great, it will look beautiful once it's all done. I love projects like that because I seldom have consistent outcomes when I'm repeating the same thing over and over. They are so very sweet and would look darling in a nursery or little girls bedroom. I'm thinking I'd like them in my sewing/guest room. Look how else she used them.


On another blog they had simply perched them on top of dollar store glass candle stick holders and they were gorgeous too. Can't wait to try them!
Blessings to you~

Wordless Wednesday


Blessing to you~

Monday, May 2, 2011

Dahlia Felt Brooch

  Happy May everyone! It will be Mother's Day before you know it so I want you to see this lovely gift idea from Megan at Not Martha. Aren't they yummy?

[dahlia corsages in reds, pinks and yellow]

They have a secret compartment on the back where you can tuck a photo or love note!

[pin backs showing pockets stitched in matched thread colors]

Don't you LOVE it? The tutorial link can be found here. And be sure to read the updates Megan has added about the best felt and glue to use. She has plenty of other great ideas to keep you busy too.

Seeing this gorgeous dahlia makes me miss my Mommy. :o( Maybe I'll make one for me in her honor!
Blessings to you~